环境准备
下载git
官网:https://git-scm.com/
根据自己操作系统安装git
下载Hugo
官网:https://gohugo.io/
GitHub地址:https://github.com/gohugoio/hugo
点击Github,点击Tags,选择合适的版本下载。
一般情况下选择带有extended版本,也就是带扩展版的版本。
搭建博客
创建Blog
1.解压hugo_extended_0.139.2_windows-amd64.zip文件,点击进入并cmd打开命令行窗口,输入hugo new site xxxx创建文件(我这里是dev)。
2.但是新创建的dev文件夹里面没有hugo.exe文件,为了使在dev文件下仍能使用hugo命令,需要复制hugo.exe文件到dev文件内。
3.在命令行中切换到已创建好的dev文件夹,输入hugo server -D,运行成功。
hugo server -D
4.打开浏览器输入http://localhost:1313/发现会出现以下界面:
Page Not Found
这是因为还未下载主题,可以看到dev\themes文件夹下为空。
下载主题
1.再次进入Hugo官网(https://gohugo.io/)。
2.点击Themes选择一款适合的主题,作为演示,我选择的是Moments这款主题。
3.点击Download进入主题github界面,并选择适当的版本下载。或者用git命令下载。
git submodule add https://github.com/FarseaSH/hugo-theme-moments.git themes/moments
或者
git clone https://github.com/FarseaSH/hugo-theme-moments.git themes/moments
4.修改hugo.toml,加上theme = "moments",引号内为主题文件夹名称。
5.再次在命令行中输入hugo server -D,即可。
Github部署
常规部署
1.准备工作:创建一个自己的github账号。
2.新建仓库,命名要用{github用户名}.github.io。
3.进入自己的仓库,前往setting -> Pages -> Branch选择main分支,然后保存,会自动开启https://{github用户名}.github.io 的地址,这地址也是以后访问博客的地址。(注意:仓库需要设置为public)
4.我们就可以往github仓库上传文件了,先回到dev文件下,进入命令行界面,输入hugo -D生成public文件夹。
5.在public文件夹下执行以下命令上传到github仓库上面。
官方的解释:https://github.blog/changelog/2021-08-12-git-password-authentication-is-shutting-down/
As previously announced, starting on August 13, 2021, at 09:00 PST, we will no longer accept account passwords when authenticating Git operations on GitHub.com. Instead, token-based authentication (for example, personal access, OAuth, SSH Key, or GitHub App installation token) will be required for all authenticated Git operations.
Please refer to this blog post for instructions on what you need to do to continue using git operations securely.
Removal
August 13, 2021, at 09:00 PST
大致意思是,密码验证于2021年8月13日不再支持,也就是今天intellij不能再用密码方式去提交代码。请用使用 personal access token 替代。
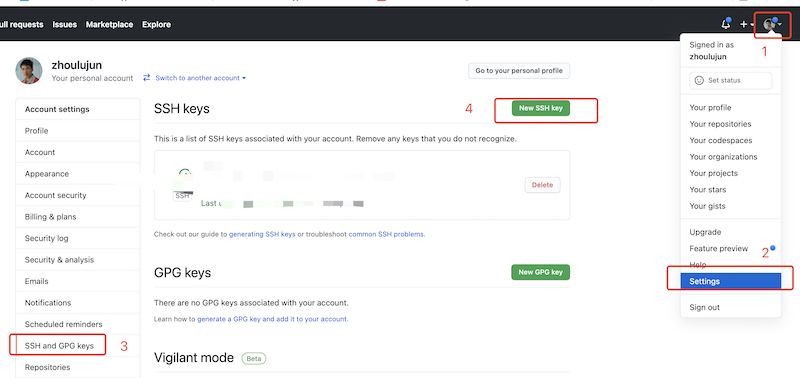
5.1 GitHub不再支持密码验证解决方案:SSH免密
5.1.1 新建一个新的SSH KEY
ssh-keygen -t rsa -b 4096 -C "xxx@xxx.com"
5.1.2 接着会提示这个公钥私钥的保存路径-建议直接回车就好(默认目录里)
5.1.3 接着提示输入私钥密码passphrase - 如果不想使用私钥登录的话,私钥密码为空,直接回车
5.1.4 生成成功后,用下面命令显示内容,把 id_rsa.pub的内容 拷贝到 github 新建的 SSH keys 中
cat /root/.ssh/id_rsa.pub

5.1.5 配置好好,记住,你项目得使用 SSH clone

5.1.6 如果本地是https 源,那么就修改git 仓库地址
git修改远程仓库地址方法有三种:
修改命令
git remote origin set-url [url]
先删后加
git remote rm origin
git remote add origin [url]
直接修改config文件
git文件夹,找到config,编辑,把就的项目地址替换成新的。
5.2 GitHub不再支持密码验证解决方案:Token登录配置
打开自己的GitHub主页,点击自己的头像找到Settings / Developer Settings / Personal access tokens / Personal access tokens (classic)

Token申请成功后,需要注意的是,请复制下来保存好, 之后,因为你再次刷新网页的时候,你已经没有办法看到它了。
生成新的token就好。权限我是全部勾选上的。
有两种方式登录。
之后用自己生成的token登录,把上面生成的token粘贴到输入密码的位置。
如果 push 等操作没有出现输入密码选项,请先输入如下命令,之后就可以看到输入密码选项了。
git config --system --unset credential.helper
把token直接添加远程仓库链接中,这样就可以避免同一个仓库每次提交代码都要输入token了:
git remote set-url origin https://
@github.com/ / .git
:换成你自己得到的token
:是你自己github的用户名
:是你的仓库名称
5.3 git上传hugo网站
git init
git add .
git commit -m "first commit"
git branch -M main
git remote add origin {你的github仓库地址}
git push -u origin main
6.上传成功后访https://{github用户名}.github.io,成功搭建属于自己的Hugo博客。
Github Action自动部署
1.Github上面重新建一个仓库,用于存放Hugo的主文件,可以设置为private。
2.前往settings -> Developer Settings -> Personal access tokens,创建一个token(classic)。
3.token选择永不过期,并且勾选repo和workflow选项。

4.为保证安全,将生成的token,保存的仓库的变量中,前往Settings -> Secrets and variables -> Actions中设置。(注意:token只能显示一次,可事先保存)


5.在hugo主文件(注意是在本地程序里面)创建一个.github/workflows/xxxx.yaml文件,将以下内容复制进去,想具体了解更多,可查看【Github Action文档】。
name: deploy

# 代码提交到main分支时触发github action
on:
  push:
    branches:
      - main

jobs:
  deploy:
    runs-on: ubuntu-latest
    steps:
        - name: Checkout
          uses: actions/checkout@v4
          with:
              fetch-depth: 0

        - name: Setup Hugo
          uses: peaceiris/actions-hugo@v3
          with:
              hugo-version: "latest"
              extended: true

        - name: Build Web
          run: hugo -D

        - name: Deploy Web
          uses: peaceiris/actions-gh-pages@v4
          with:
              PERSONAL_TOKEN: ${{ secrets.你的token变量名 }}   #譬如我的:TOKEN
              EXTERNAL_REPOSITORY: 你的github名/你的仓库名     #譬如我的:hjyl/iyl.me
              PUBLISH_BRANCH: main
              PUBLISH_DIR: ./public
              commit_message: auto deploy
6.在hugo主文件创建.gitignore文件,来避免提交不必要的文件。
# 自动生成的文件,即过滤无需上传的文件和文件夹
public
resources
.hugo_build.lock

# hugo命令,如果是Linux系统,改成hugo
hugo.exe
7.将hugo的主文件上传到仓库,上传成功后会触发Github Action,来自动部署你的静态页面。
git init
git add .
git commit -m "first commit"
git branch -M main
git remote add origin {你的github仓库地址}
git push -u origin main
参考:
https://sazerac-kk.github.io/p/%E6%95%99%E7%A8%8Bhugo-github%E5%8D%9A%E5%AE%A2%E9%83%A8%E7%BD%B2/
https://zhuanlan.zhihu.com/p/401978754
https://cloud.tencent.com/developer/article/1861466
https://blog.csdn.net/qq_37255976/article/details/134558484
B站视频教程:https://www.bilibili.com/video/BV1bovfeaEtQ/
本文地址:Hugo + Github搭建博客与自动化部署
发表评论